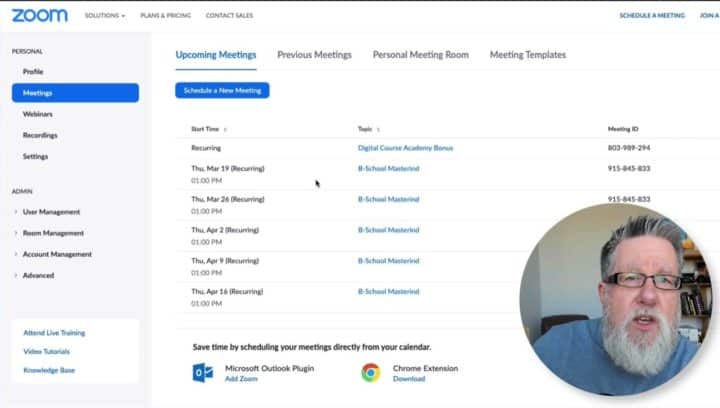
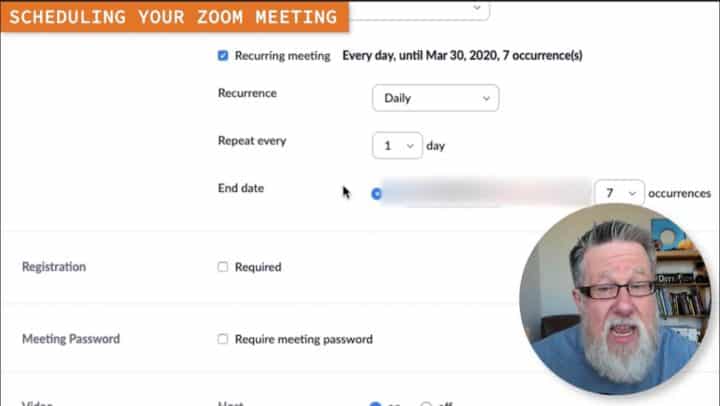
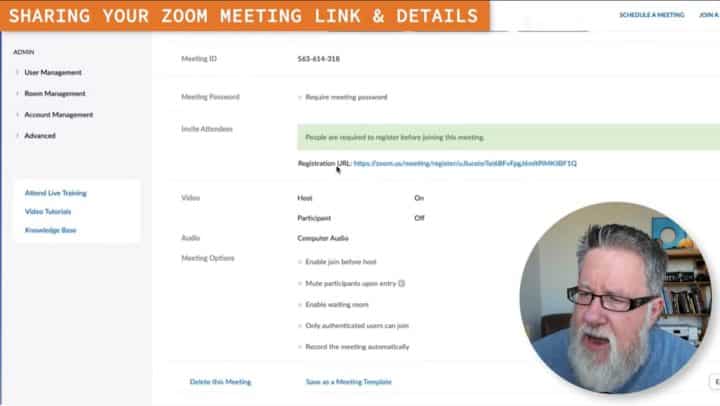
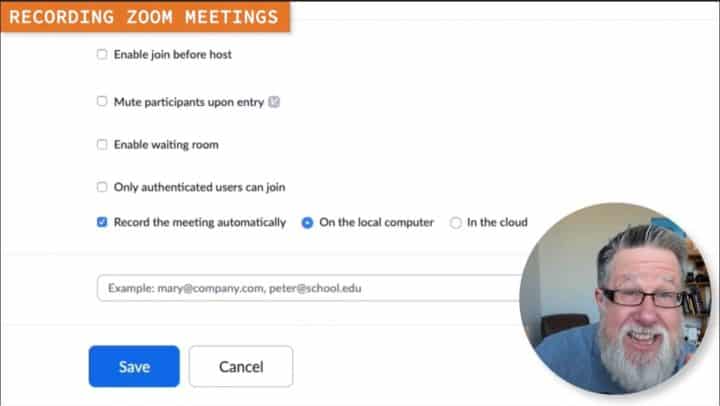
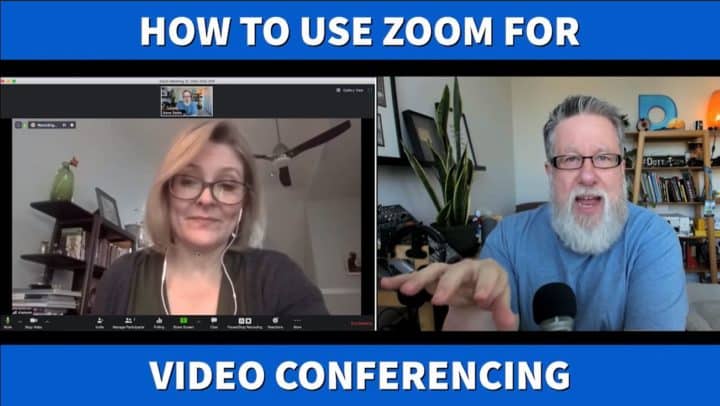
- As I record today's video, we are at the start of the lockdown period here in Canada for the Corona virus. We've been sitting at home now for a few days. I don't know when you actually watch this video what the situation in the world will be but I know that it is going to be very different then what it was, say just last week. But here in the Dotto household, my wife is a teacher and it was the start of Spring Break as we started this shutdown for the Corona virus, and Shannon came up to me and said, "Hey Steve, looks like Zoom is starting "to offer free upgraded service for teachers "so that they can continue to educate their students "even if we aren't in the classroom." and she said "Would you mind showing me a little bit "about how to use Zoom?" She hasn't used it. I thought that's a great idea Shannon, but how about if we do a video on how to use Zoom so not just you but other teachers, and in fact, other people who want to use Zoom for video conferencing can learn at the same time. So that is our goal today. Now having said that, Zoom is indeed offering upgraded service, Zoom normally in their free service has a 40 minute time limit on video conferences where you have more than three people on the conference and then if you pay for the service you get much upgraded service and you could have 100 people on for as long as you want with the paid service. But Zoom is lifting that limitation for many jurisdictions. Now ironically, they haven't lifted it as of yet, as of my moment of recording this video, it hasn't been lifted for Canada, but it looks like pretty much everywhere else in the world, Austria, Denmark, France, Ireland, Poland, Romania, South Korea, Japan, United States, they've all been lifted as well as Greece, Norway, Portugal, Switzerland, Belgium, the Czech Republic, Canada's still not on the list. I don't know what we did to Zoom but maybe they'll pay attention then they'll make sure they lift it for Canadian teachers as well. Today on Dotto Tech we're gonna be taking a look at Zoom, a great video conferencing tool, how to configure it and how to use it. Steve Dotto here, how the heck you doin' this fine day? And as promised today we're gonna be taking a look at Zoom. Now chances are you've been involved in a video conference at some point in the past, perhaps it's in Skype, perhaps it was in Google Hangout, you were probably in a Zoom or a GoToMeeting meeting, but most of us have participated in conferences from an attendee point of view, where you simply click on a link, you're brought into a room, you watch, maybe you're able to interact a little bit with chat, but you basically aren't driving the bus, you're a passenger enjoying or learning from the content that's being shared. What I'm gonna walk you through today is the process of setting up a video conference for a larger group of people, say a classroom situation where you can have 30 people in the room and then the tools that you have to administer and to deliver the content for that video conference. We are using Zoom as a platform for it. So once you sign up for Zoom and log into your account, you're brought into a window that looks something like this, it might be a little bit different depending on what you've configured and what you haven't. I use Zoom on a regular basis for supporting my business so you can see I actually have some planned meetings that are up and coming that I've already scheduled, but I'm gonna walk you through the process and the different tools that we have in place. So when you're ready to book a meeting, to plan a meeting, you go into the Zoom conference and you click on schedule a meeting. That's the first step that we do. We'll talk through the hardware and technical set up in a few moments but let's talk about the meeting itself as you schedule a meeting. This brings you into a web interface where you set a topic for the meeting, a title for the meeting, it's gonna be meeting number one. And you can offer a description. You can schedule a date and a time, now it's going to be based on your local time zone, but when people look at the registration information for that meeting it will convert it to their local time zone and if it's being added to their calendar it'll be converted to their calendar. So there's a lot of automation in the background that will help you with this part of the process. So you select a date and a time for the meeting, and so let's just put this for a week from today, at say 3 p.m., the duration of the meeting and if it's a recurring meeting. So if you're a teacher for example, and you've decided that while we're on this lockdown period not in class, we're going to meet every morning at 10 a.m. for an hour with the class in a Zoom meeting, you could then set this up as a recurring meeting and then you can schedule how often the recurrences happen, etc. Now the benefit of doing this is there's just going to be a single URL, a single login click that you're students are going to have to have so you don't have to send them a new link every day for them to log into a new meeting. The recurring meeting will use the same login over and over again, so there's a massive amount of convenience to that. That's an important step in dealing with it in this sort of environment where we might have recurring meetings as opposed to one-off meetings. So you've got that ability to set right here. You can choose whether or not you want to have people register and if you insist on registration you can ask them to register once and they can gain all of the occurrences or by the occurrence, so that's again a choice that you have. And the registration link, once you share the registration link, they'll be brought to a page which will then ask for their name and email address and when they enter their name and email address, effectively registering, they will then be emailed a link or be sent directly to a page that has the link to log in to the conference at that point. So again, the automatic process within Zoom takes care of all of those different aspects for you. You could also set it up to be password protected if you choose, something that I've never used so I'm not going to speak much to it. Now you're gonna choose what happens with the type of guests or the type of participants in the meeting. That regular participant has their video turned off when the meeting starts but the host has their video turned on, fairly simple. If you're doing a business meeting where everybody's gonna be talking back and forth you might have everybody's video turned on right at the start, that's your choice. One of the unique aspects of Zoom is it actually works with a telephone system as well. So people could actually phone in to a 1 800 number to log into a conference if they don't have robust internet in their area. This might be something that some teachers want to consider and you can configure that here, whether you want to have computer audio, both computer audio and telephone or just telephone. Then you set up your meeting options where you can choose whether or not people are already in the room before the host joins, kind of in a waiting room or kind of in the room itself so you don't have to bring them in from a waiting room or if you want them to be in a waiting room, and if that's the case, if you enable waiting rooms be aware that the host has to monitor the waiting room and then admit people from the waiting into the actual Zoom room. So that's something that you might not want to have, you might want people when they log in to be able to come directly into the meeting that way you don't have to audit and keep your eye on the waiting room and have people sit in there waiting for the host to admit them. But that's an environment where you control who gets admitted to the meeting if you choose to by enabling the waiting room. And that is the main set up points that you have to create when you establish a meeting. Once you've done this, once you've created all of these different parameters, and oh, by the way, you could also add an alternate host where you can pass off to somebody else. If you're team teaching or if you have a presenter, you can make them the alternate host, but typically speaking you're not gonna require that, you're just gonna be the sole host, you're gonna launch it. And when you save it then, it becomes a meeting in your roster of meetings that we have here. So if we take a look, here's the summary and I've got my, what do I call it, meeting number one, and I've got all of the different assets that I require now to invite people to this meeting and to manage it from an administrative point of view. So let me show you this next screen. You can add these meetings to the different calendar types with a single click of the mouse here, but you also have down here this registration URL. This is really important. This is what you will email to your students or to your people that are going to participate in your meeting. So you click on this and watch what happens. It launches when the meeting is happening, in this case we set it up as a recurring meeting, so it's happening these days, all at 3 p.m. and the person then enters their name, first name, last name, email address and they confirm it, say that they're not a robot and then when they click to register they will be sent a login link that's attached to their email address for the registration that they can use to attend all of these meetings. Very slick, very efficient. I really like the registration process. Down here in the bottom of the screen you can also see how many people have registered and see exactly where you are in the process. You could also set up to email directly to your registrants what email address it's coming from and you can set up some automated emails to remind them, etc., that the meeting is happening. So all of that functionality is here in the set up. Now you'll notice down here in the left-hand column that we set up for meetings, Zoom also has a webinar tool which has some slightly different options, but is effectively the same idea. Zoom also has the ability to record your meetings. Actually, I should show you that, I think I missed mentioning that. If we go back into the new meeting that we just created, there's the recurring meeting number one, I'm just gonna go into this because I think I didn't, aha, there it is down here. I didn't tell you to record the meeting, I didn't tell you that you can record the meeting. If I click here on edit this meeting, edit all of the recurrent, all of them. And yes, that's what I was lookin' for. I can choose to record this meeting automatically. I'm glad I showed this to you because I think this is incredibly valuable, especially for teachers. So I can record it on my local computer, which will create a video file on my local computer or I can record it into the Cloud which is recording it into Zoom's Cloud services which is gonna to be useful if you have a small amount of storage on your computer. But either way, you can then share the recording of these meetings with students or with participants that weren't able to attend or they can review the content from the meeting or from the lesson by clicking on watching one of these replays. That was important, should've mentioned that earlier. All right back to the different types of meetings we have. So we have webinars, you can access all of your recordings from this dialog box here and that's pretty much all you have to do to set up for your Zoom meeting. So once you've set up the parameters for the Zoom meeting and I encourage you to do a couple of test little meetings just with your own internal circle, maybe with your husband or wife or with a coworker so that you can get comfortable with the format, then you're ready to test it out and get ready to do the real thing. So let's show you what happens in a real meeting next. So here is what's gonna happen next. I'm gonna do a Zoom call with Shannon. She's going to set up her computer downstairs, I'm going to send her an invitation link to join us in a Zoom room and I'm gonna walk her through it and she will be a participant as in a student... Really? Make yourself comfortable. I'm just recording here, you really don't respect the etiquette of the studio, do you?, no. All right, Shannon's gonna be downstairs, she's going to, we're gonna conference her in and I'm gonna help her discover the wonderful world of Zoom. So my wife is downstairs right now on her computer and connecting with this Zoom call and I'm gonna walk her through using Zoom. And there she is. Hi Shan.
- Hi hon.
- How are you doin'?
- I'm okay now that we're online.
- You kinda know that, don't you because we were just talking two seconds ago. So Shannon is just down in our kitchen down below and she has a little MacBook and you're just using the webcam that's built into the MacBook and you've plugged in a set of earbuds so that the audio's a little bit better there. So this is the first time in Zoom, right?
- Yes.
- So I'm gonna walk you through some of the main features. Now you see the little film strip on the top that has a picture of probably you in it right now, do you see that?
- Yeah.
- So if you have multiple people in the room, you will see all of your students listed across there and if any of them have their webcam turned on, you will be able to see them here in this film strip and you actually have control over muting them or unmuting them although
- I love that feature.
- they can unmute themselves or turn on and off their own video as well so they have control but it's important to recognize that when you have a lot of people on board, you have to teach them some etiquette which is to have their microphones muted otherwise you get a lot of cross talk happening and you get a lot of noise as well. It's really preferential to do exactly what you're doing in which is to have earbuds in when you're taking because the microphone in the computer's will pick up the audio from the speakers and then you get that kind of, you'll get the echo and that sort of stuff happening if you're not careful. Now I've got advanced sound gear up here which we've invested heavily in that mitigates that problem for us but if you were to take out your earbuds down there we might get some cross talk from you down there as well, so or echo
- Okay.
- from you so that's kind of technique thing that you can work on.
- So Stevie if I have 27 kids, am I gonna see them, it says gallery view, I'll see
- Yeah.
- all of them?
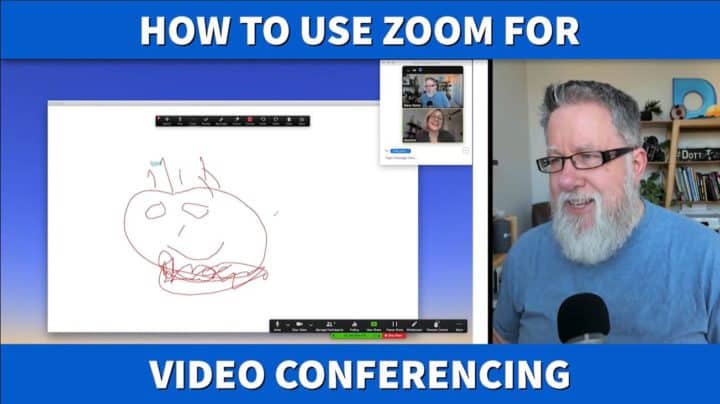
- You can switch and you'll see, you will see many more of them at that point there, they'll be laid out but you'll never get all 27 on the screen, you won't like, get that rogues gallery of all of them, but you'll be able to see most of them. And what Zoom does is anybody who starts to speak gets promoted onto the main screen so you get to see them if you ask them to talk. Unless you decide to pin your video as the main video. You see what I've got here is, you won't be able to see it, but the viewers will be able see it, I can pin my video so my video is always the one that's up so they can only see me, so you can take over. So that gives you some control over the broadcast environment as you go along. Now along the bottom of the screen you'll see some tools but I've got a lot of tools here, including the ones that I think are most important for teachers which are screen sharing and a white board tool down here, as well I'm recording this. One of the very cool aspects of this entire process is if you give a lesson online to your students and say only half of them can make it because of whatever timing, you can record that lesson and then you can upload it to YouTube or some other online service so that they can get access to the lesson later and hear all the questions and see all the assignment. Or if they need to review, they can also watch it for review so we've got some nice persistence there as a result of that as well. And I'm sure you'll want to critique your own performance as well, will you not?
- Probably, can I edit it?
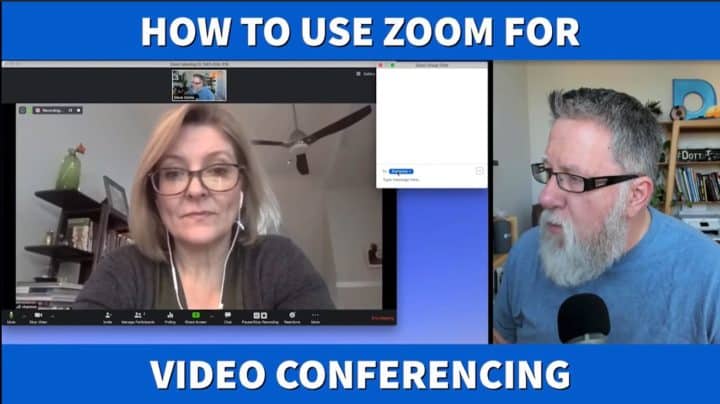
- Okay now what I'm gonna do next is I'm gonna show you how screen sharing works. Now screen sharing is really flexible within Zoom. When I click on screen sharing it brings up a dialog box that allows me to choose whether I want to share the screens that I'm looking at myself, or any of the open screens that are on my screen or even other assets like a white board which I'll show you in just a moment. But for example if you had a video that you wanted to play, if you have the browser window open with that YouTube video in it, you could open that window and you could stream that video back out to your entire community. Or, I've got a QuickTime player opener or a player window open with one of the videos, which is I know is one of your favorite videos, which I can share with you right now. "Hi, I'm Steve Dotto, a YouTube creator."
- I love that.
- "Now I wasn't "always a YouTube creator, I used to be a host of a tv..." So there we have, and by clicking down here in the bottom of the screen I can stop screen sharing and that brings us back, oh, it's interesting, it left it left it up in the background there oh, there we go, okay I'll minimize that. So that gives you the ability to stream videos through should you choose but you could also have a slide show prepared in Google slides, which you could have in a browser window or if you use Keynote or PowerPoint, you could be using those and so you could be also broadcasting slides to your group as you're delivering your lesson and that's the way a lot of business presenters certainly do things, is they prepare a slide show. And then by broadcasting the slide show to the group, it then eliminates the need for you to always be on camera, which a lot of people get a little bit self-conscious about. One of the challenges of this entire environment is you feel like you're always on camera and a lot of people get a little bit of a tunnel vision, you might even be experiencing that right now being the guest, on here.
- Look at myself? Yeah, well you feel like you can't be natural, you can't like move around, you can't you know, and people will see it if you're looking, if you're looking, if you know, if you're clipping your nails or something like that. So all of that stuff comes in, so it allows you to be off camera which is a little bit more relaxing as you're doing things. Let me show you two, a couple of other aspects. One is, if you look down at the bottom of the window, you can open a chat window which allows your community, your people to talk back and forth and they can do private messaging by clicking on it
- Like notes in class.
- there, or you can message each other. Sorry?
- Like notes in class.
- It's like passing around notes except that the teacher can see them all.
- Oh I get to see all of them okay.
- Yeah you can actually see them all. But in does allow you to do things like drop URL's or drop links or put in pieces of text that might support.
- That stays up as part of the video when I post it?
- No, the only thing that will post when you post the video is the actual video window itself. None of the supporting content around is included in the recording that you do in Zoom.
- So not even if I were to play a power point or a...
- Yeah those would, anything that you broadcast into the window would, so your PowerPoint would
- Okay.
- but things like questions that go into the text wouldn't. So this is a great way for you to invite your students to say if anybody's got a question let me know in the chat and then you can go in and you can enable their camera so that they can come on, if you indeed even want to bring them into the call, that's gonna be an engagement question that different teachers at different age groups are gonna deal with, also depending on the environment that the child is consuming it in. Remember we don't, we're using computers right now, but Zoom works terrifically well on all mobile deices as well. So your students could be watching on the phone, they could be watching on an iPad, they could be watching on another tablet, there's a lot of different options for them to be able to be consuming it. They don't have to always be on a computer. And so that means they also don't always necessarily have to have access to a microphone and a camera, they can just watch it as a participant watching without even going on you know, being seen themselves or heard themselves. But you'll see them reflected in the film strip in the top.
- Okay.
- Another thing I wanted to show you is, if we go back into screen sharing again, I like this although I'm terrible at it, you've got the ability to have a white board. And if I share a white board we've got then a board that you can type in to.
- Okay, you're not gonna actually write on it are you?
- I am writing on it, why, you afraid of me writing?
- Yeah.
- Okay, I'm gonna draw a picture for you.
- Please don't.
- There it is. I'm gonna draw,
- A self-portrait?
- a person, if it's a self-portrait I'd better give myself a beard then. You know, how's that?
- It's beautiful, it's beautiful. Can you do a little shock of hair at the top.
- Oh, yeah, just... There it is.
- Yes
- So that's the basic interaction that you have with your students. You have the ability to have chat, you can share links, they can ask questions, you can bring people into the call or remove them from the call using the film strip, they can come on by audio or video. You have the ability to share anything that you can see on your computer screen, you can share with them. So you can prepare your lessons in advance on Google slides or any other application. You can broadcast those through and your audio will be continuing through at the same time. You can record the entire piece, and then you can archive it, you can upload it to YouTube and it you can share it in a variety of ways afterwards.
- So Stevie,
- Yeah?
- I see the advantages for if I was gonna teach a lesson, right now my big concern is just interacting with my students so that they feel confident and connected to their community. Is this a good platform for that?
- Sure, we use it every day just for conferencing for our team. I mean you hear me talking to the team all the time as you go around the house
- Discussing what
- and we use it
- you're gonna do?
- just as a meeting platform, so we're not actually delivering instruction or anything like that it's just where we meet, it's our workspace that we meet in. And then even then occasionally we wanna share stuff back and forth, pictures or images or links and we're able to do that really easily right from within here. So there are other options beyond Zoom. Zoom is going to facilitate classroom, you know these classroom-type activities, but for just simple conversations Zoom is, if you are using it already, it's a simple tool but you could also at that point then consider using Skype or FaceTime or Google Hangouts, there's a couple of other different conferencing tools that you could use so you get the face time, one-on-one with the student or a couple-on-one with a student, but the beauty of Zoom is it levels up and it allows you to have these different administrative functions for the classroom and for teaching.
- Yeah, that's awesome, thank you.
- Good stuff, it's gonna be nice to have you around but I hope you're kids aren't to irritating. Shannon's a really good sport and I thank her so much for helping with this video. And to all of the educators out there, thank you so much for the effort that you're putting in and I hope you found this video useful as we chart, as we navigate these uncharted waters that we are going through in the world today. When you watch this video I have no idea what our interaction, what our personal interaction with school's gonna look like, what work's gonna look like. It's gonna take us a while to return to some form of normalcy I can just imagine, but we're blessed to have tools like Zoom and Google Hangout and Skype that we can still communicate really effectively and maintain a distance. So I'm hoping that you found this little video, this tutorial both enlightening and encouraging as we reinvent ourselves in this current time. If you have any comments I would love to see them. We will answer as many as we possibly can. If you've not yet subscribed to this channel what are you waiting for? Subscribe, and make sure you ring that notification bell so you hear when we upload new videos here at Dotto Tech. Thanks so much to Shannon, until next time, I'm Steve Dotto, have fun stormin' the castle.