Zoom conferencing has become the new normal for meetings. Read this to learn how to enhance your virtual background with a little green screen magic.
Due to the current state of the world, we are increasingly working from home—and as a direct result, more and more of us are getting into Zoom conferencing.
Working remotely means we need a way to communicate with our colleagues and clients on a consistent basis, even just in the virtual space. Since face-to-face meetings are currently out of the question, Zoom meetings are the next best thing.
Video conferencing doesn’t really require much from us, if you think about it. (In fact, I think I’ve seen enough jokes about people “going to work without wearing pants” to last me all the way to 2021.) However, it doesn’t hurt to want to up your Zoom video conferencing game, especially if you want to project a more professional image or promote your brand.
Now, in my opinion, the best way to do that is to improve the quality of your audio, maybe invest in some good equipment. However, I won’t deny that looks also matter, so today, we’re going to look at how you can easily add some panache to your Zoom videos.
Visual Enhancements for Zoom Conferencing
Actually, you won’t believe the number of people who’ve been asking me about how to effectively use Zoom’s virtual background options. Some want to make their digital backdrops look just a tad more convincing; others simply don’t know where to start!
Thus, I decided to whip up a quick and easy tutorial for using Zoom background effects.
So first, I set up a Zoom room. Of course, I was the only one here — though if you watch the tutorial here, you’ll find a certain somebody making a furry cameo (and quite a ruckus)!
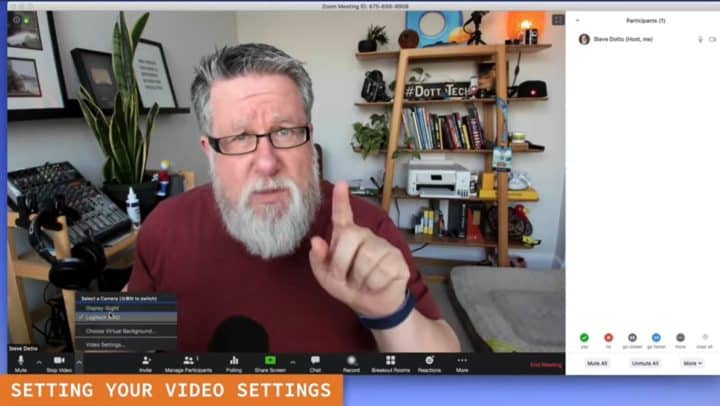
Now, at the bottom of your screen, you’ll find your video options. There, you can choose which camera you’re going to use as the main feed. In my case, I have two cameras: the built-in camera in my Mac (which I don’t really like, quality-wise), and my Logitech Brio, which is my camera of choice (and the one I used for this video).
You can also go into the Video Settings there. Click it, and you’ll see a dialog box that allows you to control your overall video settings, including your video size.
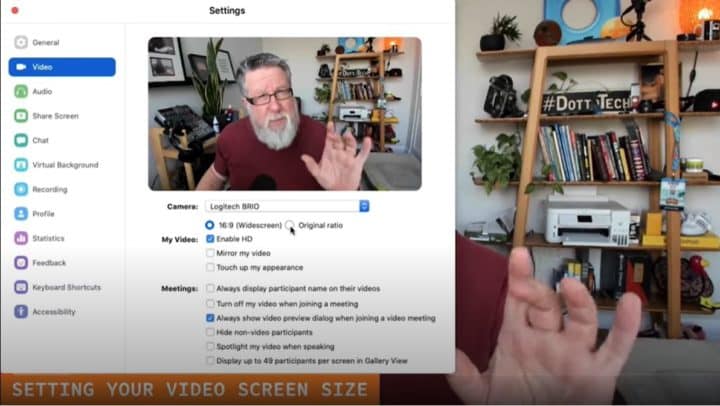
In your video settings, HD is disabled by default. You can enable it, though, and you’ll immediately notice that the difference in quality is quite significant. However, I would actually think twice about turning on HD. If you’re using your bandwidth to upload your video and you’re in HD as you’re broadcasting, that just puts tremendous strain on your system. Add that to the fact that, well, everyone’s online now—I’m sure I’m not the only person here who has noticed a degradation of performance in many apps these days—so imagine just how much of a burden an HD broadcast would be. My suggestion? Keep things low-end, for efficiency’s sake.
One of the things we tend to forget is that if our cameras aren’t set properly, our video transmission ends up being mirrored: Left becomes right, and vice versa. Fortunately, you can easily fix that in your Zoom conference, too. You have the option to mirror your video, flipping it to ensure that it’s properly oriented and to prevent further confusion from your audience.
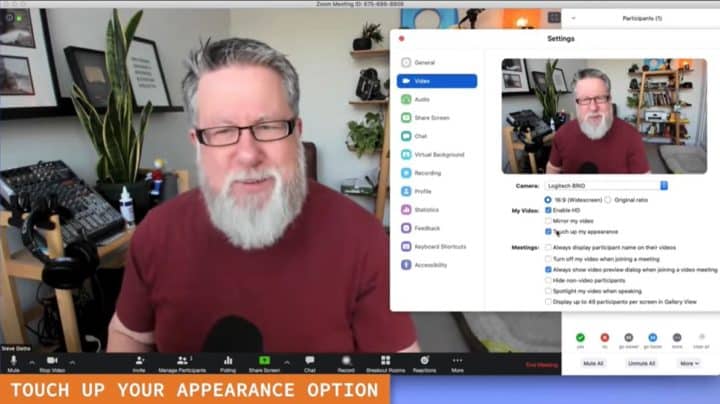
There’s also an option to touch up your appearance, which sort of softens the focus on your face. Think of how they hide the age wrinkles on Hollywood stars’ faces through the camera, and you’ll get what I mean. Now, that’s useful for movies and TV shows, but I don’t really see it as a necessity for a video call. Still, whatever works for you—the important thing is that the feature is there.
Enhancing Zoom Conferencing with Zoom Background Effects
Now, it’s time to get to the real meat of this discussion: the virtual background!
Setting up your virtual background on Zoom is easy.
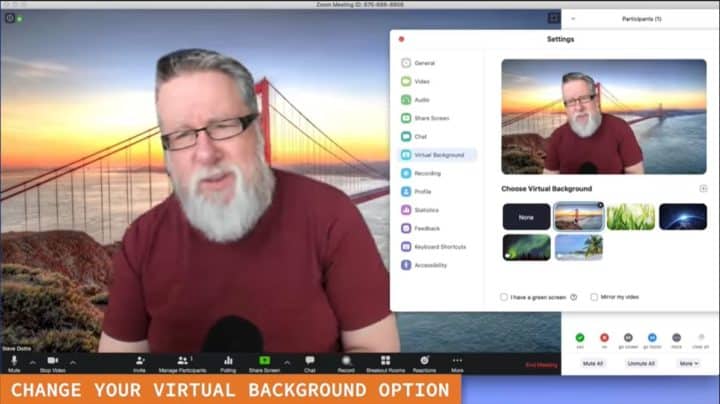
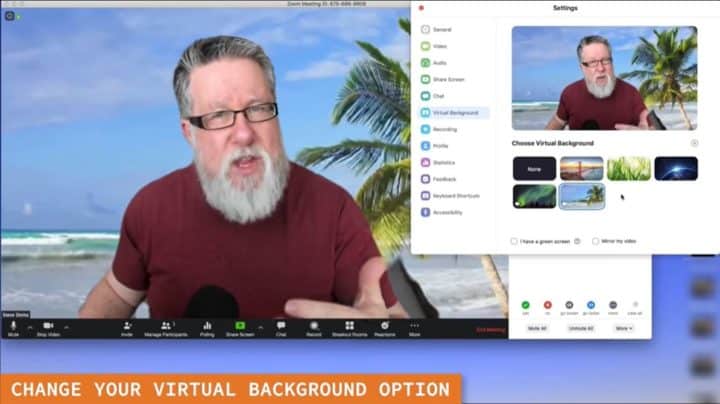
In the Settings dialog box, click on the Virtual Background tab. You’ll see a list of background options you can use, as well as the capability to upload a background. Basically, you can pick presets or upload your own (for instance, an image you really like, or a branded background for your business).
Zoom can discern what your actual background is, to a relatively satisfactory degree. After it does this, it can block it out and bring your preferred virtual background in.
However, while setting up your virtual background is simple, making sure it works the way it’s intended to, isn’t as easy… especially if, like me, you have a very busy background in your home office.
You’ll quickly notice that as soon as you move your head around… well, pandemonium strikes. Chunks of your flesh disappear, with chunks of your actual background appearing in their place.
Yikes.
Unless you have a solid color or clean background behind you, Zoom will have a bit of a hard time distinguishing body from backdrop. And while having a busy office background might be great for making your audience feel more at home, you might want to keep things clean, especially if you’re trying to project a more professional image.
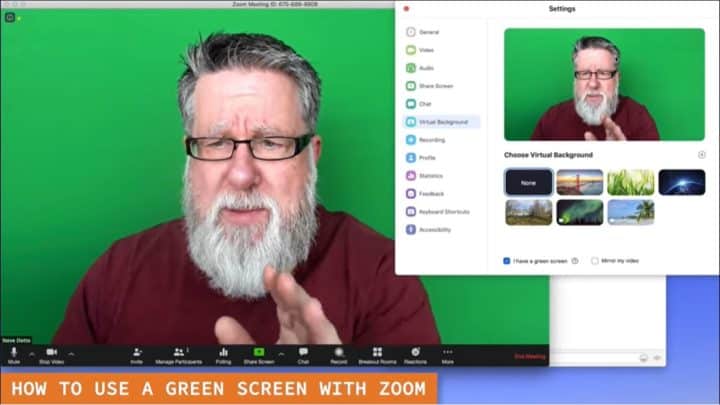
In other words, if you have a fairly neutral background, virtual backgrounds will work like a charm. Otherwise, you might want to set up a green screen.
Zoom Conferencing: A Green Screen Tutorial
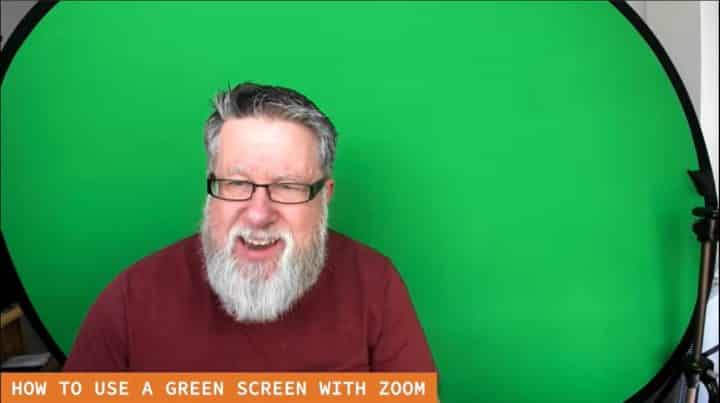
I set up a simple “green screen” background behind me, with a large piece of green fabric positioned right in front of my backdrop and behind my chair. You’ll notice in the video that I zoomed my camera in a little bit using my camera settings, because the field was too wide.
With the green screen in place, even if I move around, the background looks very natural. Almost realistic, in fact.
However, I should point out that despite the green screen, you may still have trouble. For instance, it might not pick up the color of your green screen right away, turning yourself into a rather bizarre and somewhat hilarious horror show (or perhaps a Terminator—eat your heart out, Arnold!), as you can see in this screenshot:
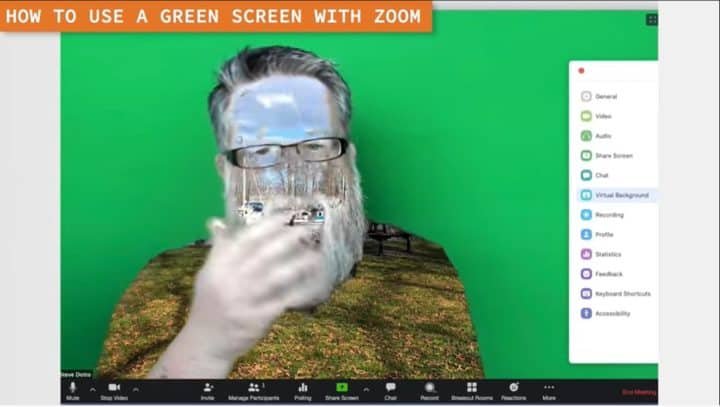
Fortunately, there’s an eyedropper tool here that you can use to remedy this. Just go into your Settings again, find and use the crosshair tool, and click on the green screen or whatever solid-colored background you have. This tells the app what color to pick out of the background. After that, you can easily plug in any static image or video.
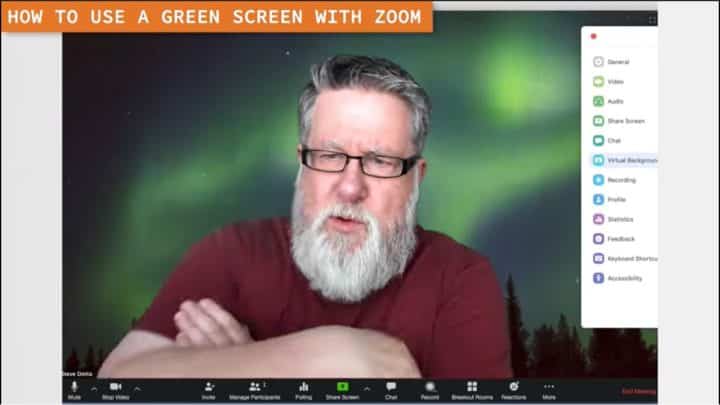
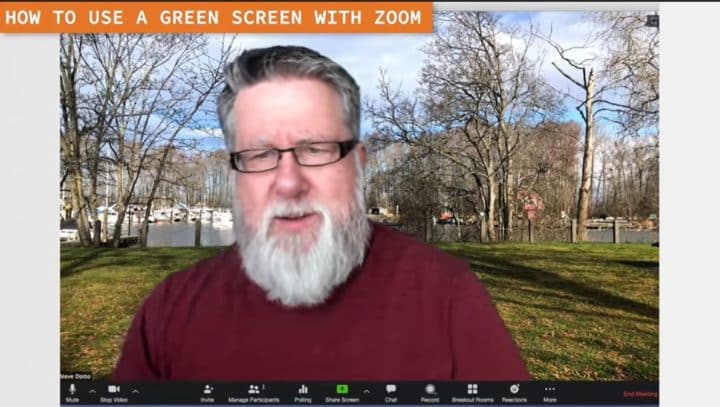
Seriously, check out how the aurora borealis looks behind me – pretty awesome!
So if you want to improve the quality of your video conference, it’s pretty easy to change your background in Zoom. Aside from making your home office look more professional, it also makes these dreary conference calls significantly less boring. Wouldn’t you agree?
If you want to check out the full Zoom conferencing green screen tutorial on YouTube, click here.
- Everyday, more and more of us begin video conferencing. So, in order to stand apart from the rest of the madding crowd, it is important for us to up our video conferencing game. Now, in my opinion, the best way for you to up your video conferencing game is to improve the quality of audio. But a lot of you are also interested in improving the quality of your video, and adding a little bit of interest, a little bit of panache to your video. That's what we're gonna take a look at today. How do you add some panache to your Zoom videos, on DottoTech. Steve Dotto here; How the heck are you doing this fine day? As more of us are gravitating towards Zoom as a conferencing tool as we are working, increasingly from home and having to do more and more video conferencing, I thought I would share with you, actually, I didn't think I would share with you. So many people have been asking me, in our comments, in our other Zoom tutorials, about how to use the green screen option and how to use the virtual background, and the different video options that are built in to Zoom, so I thought, we should do a video on that. That is what we are doing right now. So the screen that you see me in right now is actually my Zoom screen. I just don't happen to have anybody else in the room with me, but as a host of a room, this is what you will be facing. Down here, in the very bottom of that screen is your video options. Now actually, there are two places, within the room itself where you can set up different video options. One is down here. We go down to the bottom and click. You can choose your different resources. I have, for example, have two different cameras that are enabled on my computer. One is my display iSight, because I'm using a MAC, so there's a builtin iSight camera, which frankly sucks. And my Logitech BRIO, which is my camera of choice, which you see me talking to you on right now. We can also go in to the video settings here, which open this dialogue box that allow us to control the overall video settings that we are displaying. For example, if we want to have the original ratio, if we have a webcam that doesn't necessarily broadcast widescreen, or if we're going widescreen. You could also choose to turn on and enable HD. The default is not to have HD turned on, and you'll see the quality difference when I turn off HD. I would think twice about turning on HD. It's one thing for me now, when I'm recording this demo so I have good quality video on YouTube, but it's an entirely other issue if you are using your bandwidth to upload your video and you're in HD as you're broadcasting, because, as there's so much extra stress on our systems, you might wanna think about just broadcasting in standard definition, because there's so much bandwidth being used up by all of the different people who are online, that bandwidth is becoming increasingly dear and I think we've all noticed a degradation in service of different applications. So, turning off HD might be a good idea for most video conferences. Just food or thought. You could also mirror your video here, which basically flips the video if it's important to you. Especially if you're pointing to things, and you're verbally saying, to the right, to the left, to the right, to the left, and it's mirrored, so everybody gets all confused. Now, if I say to the right, it is gonna be to the right. If I say, to the left, it's indeed to the left. But if I turn it back to regular, non-mirroring video, then it's the opposite. The right for me is your left, if that makes sense. I don't know why they do this, but they also have this thing, and let me turn on. First of all, lemme just show you what my video looks like. Move off to the side; there's my face. Hello, here's Steve's face. Do I need to be touched up? This is what touching up my appearance does. Is it softens the focus on my face. It's sort of like when they used to put Vaseline on the lens for different Hollywood stars so that you didn't see the age wrinkles as much. I'm ready for my closeup now, Mr. DeMille, I might say, but you can touch up your experience if you choose to. I don't know. It's not something that's very important to me. But you can certainly do that. What people are really interested in is this. The virtual background. And we can choose it from this dialogue box here, or you can choose it as a popup right here, saying choose virtual background. Now Zoom has the capability to be able to discern what your background is, relatively well, and key that out. In other words, block it out, and bring another background in. So, if I wanted, and they give you these presets. So if I wanted the Golden Gate Bridge, I just choose it. But as you can see when I move my head around, it doesn't do a very good job. The reason, and it would do a good job if say I had a nice white background, but I have a very busy background here in my office. And I've set up my office just like this, because I wanted to have a living set. I wanted to have something that brought people in to my home environment and made them feel comfortable, and that's why I've got this set that's set up to be an interesting environment that I shoot in. But a lot of you don't necessarily want that. A lot of you wanna block off the signs of your real life. Perhaps there's a mess behind you, or you don't think it's professional to be seen in your home environment. So you have the option of using the virtual background. If you've got a fairly neutral background, it will work well. But if you don't have a fairly neutral background, then you wanna use a green screen, and I'll show you the green screen in just a minute. I'll set mine up. I'll go through the process of setting it up. It's a pain in the ass. I don't like doing it all that much, but I'll do it just for you. Just because I know you wanna see it. But before we do that, they give you a whole variety of options here, small selection of options, of backgrounds and videos that you can play in the background if you want to kind of up your background game. And you could also put your own backgrounds in. If you have a branded background that you want for your business, or you've got an image that you think is a good idea, you could upload that image. Now I did, I went on my walk today, I took a lovely picture of the marina by my house. And there it is. So there I've got the marina in place. So you could put your own picture in. Now you can imagine if you're a corporate identity, you might wanna have your logo and your corporate information here, so you can use it from a professional or from a comfort and kind of a personal basis of adding these images. Plus, if you do a search online, you're gonna find dozens of other services that will allow you to download and purchase backgrounds. So, you can have yourself on the bridge of the Starship Enterprise, or any other environment that you choose that you want. You can license and you can purchase background images that are pre-baked for you. But as I say, looking at the quality, and it does, it looks kind of, it looks hokey, because it keeps cutting in and out, because it's having trouble resolving the background that I'm against. So let me show you how it looks when we set up the green screen. So I guess I better set up my green screen first. Just give me a minute here. It'll take me a few seconds. I got one of these popup green screens. It's got a metal band running through it that's steel that pops open. It maintains a memory and it holds it taught. You could also get green screens that are pipe-based that's basically just a cloth that you pull in a pipe and you stretch out. Those are even more awkward to set up than these, but this is kind of an explosion. Farley, the dog, hates it when I do this. I better get my stand ready for this. So this has got a single point stand that I can open up. What I do for you guys. Here we go, got it, nobody was hurt. I'm fine, I'm fine, don't worry about it; it's all good. There we go. I need that. Okay, we got it, I just gotta get it centered. Just give me a minute here, and I'll get this figured out. And I gotta go this way here. There we go. All right, oh, the dog's here. Okay, Farley, get out of there. Get out of there. You're gonna mess everything up, Farley. It's not great, it's not terrible. Oh gosh, okay. So I'm just gonna show you how the background looks now, once I use the green screen. And you see how much better it is now? Oh, wait a minute. Lemme get to. Oh, Farley, off! He just made a break for it. Okay, so now I've got it set up. So let's, so we can see the green screen here behind me and what I did is I actually zoomed my camera in a little bit. I used my camera settings to zoom it in, because the field was too wide. So that's something that you're gonna have to pay attention to. But now I can choose that nice background that I had and look a the beautiful background. And you see how now, because the green screen is in place, as I move around, it keys it out nicely, and looks very natural. It looks really good. It looks almost realistic. Now I should point out that you may have trouble. It may not pick up the color of your green screen right away, and if it does, there's a little eyedropper tool here that, this is what could happen to you. You could end up with something like this, which is, when you go to create it, which is it's picked up the wrong color. It hasn't recognized the color of your green screen. And you could use a different color. You could use a blue screen. Or you can just use the color of your wall at that particular case. But if you puck up the color, all you do is you go in to the settings here, you choose this kind of little crosshair tool, and then you click on, turn it on again, click on, see how that little plus there, you click on the green screen, and that tells the computer what color to key out in the background. And you can have something like a still image, as we said, or you could have, this is very cool. Look at how cool the Aurora borealis looks behind me now. That is pretty awesome, I think. So, it's pretty easy for you to change out the background if you wanna improve the quality of your video conference. I think where this is really most important, it eliminates boredom for us in a lot of cases. But where this is important, where it works well, is if you have branding or you need to set some sort of a corporate identity, and you wanna include that and since we don't have the option of welcoming people in to our offices now, we can project our office out in to cyber space to whoever it is we happen to be visiting with. I hope that you found this useful. Looking forward to your comments and suggestions. I read each and every one. Make sure you give this video a thumbs up. If you found it valuable, share it with your friends. And if you've not yet subscribed to the DottoTech channel, please subscribe and make sure your ring the notification bell so you hear when any new videos are published. We've got a whole series of videos on how to use Zoom. I encourage you to watch those and again, share those. Till next time, I'm Steve Dotto. Have fun storming the castle.
Do you need to
STEP up your productivity?
If your answer is YES, then you should sign up to our free weekly Webinar Wednesdays to go behind the scenes and get tips and tricks on how you can 10X your productivity and become a better content creator.